Getting started with Snakemake
- snakefile: rule and workflow concepts
- how rules are linked thanks to input/output files, and the use of a target rule
- how to generalise the inputs of a rule and the expand function
As a last step to this exercise, we will see below:
- how to visualise your pipeline
- how to simulate the execution with dry-run
Visualising your pipeline
Now that we have a complete pipeline, let’s ask Snakemake to make us a summary plot. This is especially interesting for big pipelines to make sure that your workflow is doing what you think it should be doing!
Snakemake uses the dot tool (of the graphviz package) to create diagrammes of the complete workflow (--dag option) or of the rule dependencies (--rulegraph option):
					snakemake --dag -s ex1_o6.smk | dot -Tpng > ex1_o6_dag.png
snakemake --rulegraph -s ex1_o6.smk | dot -Tpng > ex1_o6_rule.png
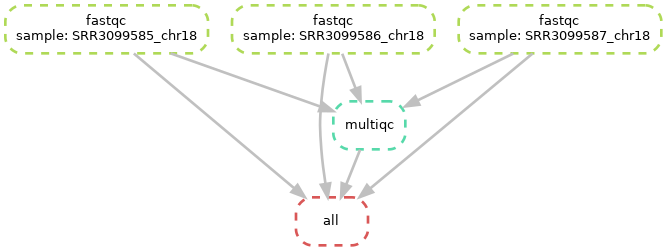
Diagramme of the complete workflow

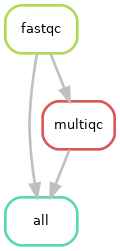
Diagramme of the rule dependencies

As you can see above, all fastqc outputs have arrows going to both the multiqc and to the target “all” rule. This is linked to what we specified in your input directive of the “all” rule in our snakefile. In theory, it only needs the multiqc output, but we decided to also specify the fastqc outputs in there. Both options should work.
You can also see, at the top of the left plot, that Snakemake specifies the different values of our “sample” placeholder.
Dry runs
Another way of verifying your pipeline is to use the dry run option. Snakemake will then simulate the run and you can see from the log on your screen what steps it would have executed and why.
-n (short) or --dryrun (long) to your snakemake command line:
snakemake -s ex1_o6.smk --cores 1 -p -R multiqc --dry-run # -R multiqc is used to force re-execution of the multiqc rule
And you’ll get something like this as output:
					Building DAG of jobs...
Job stats:
job        count
-------  -------
all            1
multiqc        1
total          2

Execute 1 jobs...

[Thu Feb  8 14:14:51 2024]
localrule multiqc:
    input: FastQC/SRR3099585_chr18_fastqc.zip, FastQC/SRR3099586_chr18_fastqc.zip, FastQC/SRR3099587_chr18_fastqc.zip
    output: multiqc_report.html, multiqc_data
    jobid: 0
    reason: Forced execution
    resources: tmpdir=<TBD>

multiqc FastQC/SRR3099585_chr18_fastqc.zip FastQC/SRR3099586_chr18_fastqc.zip FastQC/SRR3099587_chr18_fastqc.zip
Execute 1 jobs...

[Thu Feb  8 14:14:51 2024]
localrule all:
    input: FastQC/SRR3099585_chr18_fastqc.html, FastQC/SRR3099586_chr18_fastqc.html, FastQC/SRR3099587_chr18_fastqc.html, multiqc_report.html
    jobid: 4
    reason: Input files updated by another job: multiqc_report.html
    resources: tmpdir=<TBD>

Job stats:
job        count
-------  -------
all            1
multiqc        1
total          2

Reasons:
    (check individual jobs above for details)
    forced:
        multiqc
    input files updated by another job:
        all

This was a dry-run (flag -n). The order of jobs does not reflect the order of execution.
- learn more about wildcards and how to scan through files with glob_wildcards()
- learn how to use a config file
- learn how to redirect the output log to files
- understand and learn how to control when Snakemake should rerun a rule
In Exercise 1C, we will learn how to adapt your pipeline to an HPC environment.
In Exercise 2, we will learn how to adapt a bash scripted pipeline into a Snakemake workflow.